H310/H710/H710P/H810 Mini & Full Size IT Crossflashing
https://fohdeesha.com/docs/perc/
H310/H710/H710P/H810 Mini & Full Size IT Crossflashing
This guide allows you to crossflash 12th gen Dell Mini Mono & full size cards to LSI IT firmware. Mini Mono refers to the small models that fit in the dedicated "storage slot" on Dell servers. Because iDRAC checks the PCI vendor values of cards in this slot before allowing the server to boot, the generic full-size PERC crossflashing guides do not apply. This guide however solves that issue. Technical explanation for those curious. The following cards are currently supported (if you have a model not listed, contact me):
- H310 Mini Mono
- H710 Mini Mono
- H710P Mini Mono
- H710 Full Size
- H710P Full Size
- H810 Full Size
Thanks
Jon Sands
fourlynx
WildOne69
Various STH Members
Why
There's two main reasons to do this, assuming you don't need the hardware RAID functionalities of the stock firmware:
Better Performance: the plain LSI IT firmware in this guide drastically increases the max queue depth of the adapter. For instance on the H310 Mini, it goes from 25 with the stock Dell RAID firmware to 600 with the LSI IT firmware. This can mean drastic improvements in IOPS with heavy SSD configurations for example.
Different Driver: The stock Dell firmware (MegaRAID-based) uses the MegaRAID driver in Linux/FreeBSD/etc. In some distributions this can cause issues, for example FreeNAS has issues pulling SMART data from drives connected to a MegaRAID controller. After crossflashing to IT mode, the card is used by the OS via the much simpler mpt3sas driver.
Preparation
Ensure there is only one LSI-based adapter in your system. If there are others besides the adapter you intend to flash, remove them! Also in the server BIOS settings, under Integrated Devices, ensure both SR-IOV Global Enable and I/OAT DMA Engine are disabled. They are disabled by default, so unless you've changed them in the past you should be good.
Remove the RAID battery from the adapter. The IT firmware has no cache for the battery to back, in fact the IT firmware will have no clue the battery is there if you leave it connected. To make matters worse, in rare cases some people observed the battery holding old Dell code in the card's RAM and it made their crossflash process a pain. Just unplug/remove the battery and store it somewhere in case you return to Dell firmware.
Download the ZIP below which contains two ISOs. One is a FreeDOS live image, the other is a Debian live image. Both come prepackaged with all the required tools and files, and they can be booted either via iDRAC virtual media or by burning them to a flash drive via Rufus, using dd, or your favorite flashing utility - up to you.
Dell Perc Flashing ZIPVersion: v1.8ZIP Updated: 02-23-2021MD5: 577cef6f3969f04475d50ceb71d8f52d
Note: If you know you have an H310 Mini (not an H710), skip all of the below and jump right to the H310 Mini Guide. Otherwise, continue below.
Finding Your Card Revision
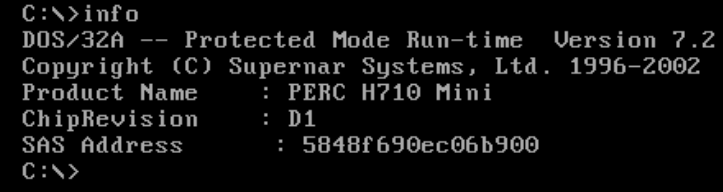
Boot the server off the FreeDOS ISO. Once it's booted, just run the following command, which will spit out the name and revision of your card:
info
WARNING: If you are flashing a card in a blade chassis (like an M620 or M820), only use the "for blades" guide for your specific card model below. For example, the H710 Mini (D1) Blade Guide. Following any of the "normal" guides on a blade server will brick the PERC
If it displays an H310 Mini, proceed to the H310 Mini Guide
If it displays an H710 Mini B0 revision, proceed to the H710 Mini (B0) Guide
If it displays an H710 Mini D1 revision, proceed to the H710 Mini (D1) Guide
If it displays an H710 Mini D1 revision and it's in a blade server, proceed to the H710 Mini (D1) Blade Guide
If it displays an H710P Mini B0 revision, proceed to the H710P Mini (B0) Guide
If it displays an H710P Mini D1 revision, proceed to the H710P Mini (D1) Guide
If it displays an H710 Adapter B0 revision, proceed to the H710 Full Size (B0) Guide
If it displays an H710 Adapter D1 revision, proceed to the H710 Full Size (D1) Guide
If it displays an H710P Adapter B0 revision, proceed to the H710P Full Size (B0) Guide
If it displays an H710P Adapter D1 revision, proceed to the H710P Full Size (D1) Guide
If it displays an H810 Adapter B0 revision, proceed to the H810 Full Size (B0) Guide
If it displays an H810 Adapter D1 revision, proceed to the H810 Full Size (D1) Guide
If it displays anything that doesn't exactly match the above choices, contact me with a screenshot. If you're impatient and pick the "closest one" instead, you'll brick your card.
Extra: Revision Info & Part Numbers
The main difference between the B0 and D1 revisions is the D1 will link at PCIe 3.0 speeds, instead of PCIe 2.0. This will almost certainly never cause a bottleneck unless you have every SAS port on the card connected to very fast SSDs that all get hammered at the same time. Even then, you're likely to reach the card's processor limitations before the bus bandwidth limit. The difference with the P cards (H710P) is more cache (1GB vs 512MB), but this is totally irrelevant when running the card flashed to IT mode as the cache is not used.
Regardless, since they're the same price used, you may as well grab the D1 revision. Note that many ebay sellers just stick popular part numbers in the listing title, so try to verify in the actual auction images that the label states the correct part number. Note that most sellers omit the leading 0 so you'll get more results doing the same:
H710 B0 Full Size Part Numbers:
- These full size cards are still $$$ for some reason
- Unless you already have one just buy an actual LSI card for half the price
- 017MXW
H710 D1 Full Size Part Numbers:
- These full size cards are still $$$ for some reason
- Unless you already have one just buy an actual LSI card for half the price
- 0PX45J
H710P B0 Full Size Part Numbers:
- These full size cards are still $$$ for some reason
- Unless you already have one just buy an actual LSI card for half the price
- 0V9RNC
H710P D1 Full Size Part Numbers:
- These full size cards are still $$$ for some reason
- Unless you already have one just buy an actual LSI card for half the price
- 07GCGT
H810 B0 Full Size Part Numbers:
- These full size cards are still $$$ for some reason
- Unless you already have one just buy an actual LSI card for half the price
- 0HVCWY
H810 D1 Full Size Part Numbers:
- These full size cards are still $$$ for some reason
- Unless you already have one just buy an actual LSI card for half the price
- 0NDD93
H710 B0 Mini Part Numbers:
- 0MCR5X
- 0FRH64
H710 D1 Mini Part Numbers:
- 05CT6D
H710 D1 Mini For Blades Part Numbers:
- 062P9H
H710P B0 Mini Part Numbers:
- 0TTVVV
- 0N3V6G
H710P D1 Mini Part Numbers:
- 0TY8F9
Unknown:
- 0PK2W9
Contributing:
The markdown source for these guides is hosted on my Github repo. If you have any suggested changes or additions feel free to submit a pull request.
Documentation version: v2.4 (02-23-2021)
.
H710P D1 Full Size IT Mode Flashing
Continued instructions for flashing the H710P Full Size (D1 Revision). You should only continue here after following the Introduction Page. If you haven't done so already, go back.
Verify & SAS
You should still be in the FreeDOS live boot image. Double check you are on the right guide by running the following command again:
info
Your output should exactly match the below:
Product Name : PERC H710P Adapter
ChipRevision : D1
SAS Address  : xxxx (will differ)
If so, continue on! If not, stop and go back to the introduction page and get on the right guide.
You also need to note the SAS address of the card from the above output so we can program it back later. Take a screenshot of the console, or otherwise note down the address so you can write it back at the end of the guide. It's not a huge deal if you lose it, but it's easiest to program back the original address instead of generating a new one.
Cleaning The Card
Still in FreeDOS, run the following command to wipe the flash on the card and get rid of all Dell firmware. This will also flash the required SBR:
BGPD1CRS
Follow the prompts. If it finishes without error, it's time to reboot into Linux. Get the Linux live ISO from the ZIP ready to boot from, then tell FreeDOS to reboot:
reboot
Linux Time
You should now be booted into the Linux ISO from the ZIP. Use the following credentials to login: user/live
We highly recommend SSH'ing to the live ISO so you can copy/paste commands and not have to use the iDRAC virtual console. To do so, run the following to find the IP of the install:
ipinfo
It should spit out an IP. SSH to it, using the same user/live credentials. This is not required and you can continue on using the iDRAC (or physical) console, but it will be slightly more inconvenient.
Flashing IT Firmware
Now, still in Linux, we need to change to the root user:
sudo su -
Now we run the flashing script. Issue the following command to begin the process:
D1-H710
It should automatically do everything required to flash the card. If you don't get any unexpected errors and it completes, we need to reboot and program the SAS address back to finish. See the following note.
Note: For some reason, the very first boot after crossflashing the card will cause a kernel panic - I believe it's iDRAC not letting go of something (I was able to see the card put in a fault state via the debug UART when this happens). This only happens the first reboot after crossflashing. When you boot back into the live ISO and get the panic, either let it reboot itself, or use iDRAC to force a reboot. After that boot back into the live ISO again and all will be well.
Programming SAS Address Back
Now rebooted back into the live Linux image, just run the following commands, filling in the example address with your own, that you noted down earlier:
sudo su -
setsas 500605b123456777
It should succeed without errors. That's it! You can run the following command to get some info about your new card. You should be able to see your SAS address and the same firmware version:
info
        Controller Number              : 0
        Controller                     : SAS2308_2(D1)
        PCI Address                    : 00:02:00:00
        SAS Address                    : 0000000-0-0000-0000
        NVDATA Version (Default)       : 14.01.00.06
        NVDATA Version (Persistent)    : 14.01.00.06
        Firmware Product ID            : 0x2214 (IT)
        Firmware Version               : 20.00.07.00
        NVDATA Vendor                  : LSI
        NVDATA Product ID              : SAS9207-8i
        BIOS Version                   : N/A
        UEFI BSD Version               : N/A
        FCODE Version                  : N/A
        Board Name                     : SAS9207-8i
        Board Assembly                 : N/A
        Board Tracer Number            : N/A
Unless you also need to flash boot images for booting off the card, you can now ditch all the live images and reboot back into your normal system, and enjoy your IT mode card.
Optional: Boot Images
Note: flashing these can add up to 2 minutes to server boot time if you have a lot of drives. Be sure you need them!
If you need to boot from drives connected to this adapter, you'll need to flash a boot image to it. Otherwise, skip it. This is what gives you the "press blahblah to enter the LSI boot configuration utility" text when the server boots. To flash the regular BIOS boot image:
flashboot /root/Bootloaders/mptsas2.rom
If you want to UEFI boot from drives connected to this adapter, you need to flash the UEFI boot image (the card can have both UEFI and BIOS boot images flashed):
flashboot /root/Bootloaders/x64sas2.rom
You can now ditch the live images and boot back into your normal system.
Optional: Reverting
If for some reason you need to revert back to the stock Dell PERC firmware, that's easy. Boot back into the FreeDOS live image, and run the following command:
BGPD1RVT
That's it! When it finishes, just reboot back to your normal system with the reboot command.
Note: This uses the unmodified latest Dell firmware
21.3.5-0002,A09extracted from the update EXE found here.